| Why splitting solids sometimes come to nothing ? |  |
|
|
Solid splitting usually comes to nothing when the splitting plane or surface crosses solid “leaks”: The resulting intersection being not connex, the operation must therefore be aborted. This connexity problem must therefore be solved first in your 3D modeler. Sometimes, this problem may also be caused by face topological singularities, blocking the intersection process. Moving the intersection plane slightly is then usually enough to solve the problem. For instance, such problems may occur when cutting a symmetrized hull solid by a center lateral plane.
|
||
| How to control Wetted Surface calculation accurately ? |  |
|
|
The wetted surface calculation is controlled by face's layers (solid's faces can have distinct layers). |
||
| Why is Ship's silhouette sometimes ignored in the calculations although it is present in ship's model ? |  |
|
|
MAAT Hydro's identification of ship's silhouette is based on 2 criteria: - Silhouette line must be closed (less than 0.1 mm tolérance) to allow calculating its area. - Silhouette line must be in the 'Silhouete Layer' declared on [Ship] tab's [Hydro] page. Moreover, for obvious reasons, the silhouette line(s) should remain in the longitudinal plane. Silhouette descriptors will therefore remain unrecognized as long as they won't comply with these two rules. So, when ship's silhouette is ignored in the calculations although it is present in the ship model, the cause of this problem is generally one of the followings: - The silhouette line is not located in the 'Silhouette Layer' declared on [Ship] tab's [Hydro] page: In this case, just correct line's layer on the [Data] page or modify the 'Silhouette Layer' on [Ship] tab's [Hydro] page. - The silhouette line is not exactly closed: In this case, just select the line in the 3D browser and right click to select 'Loop Line' in browser's popup menu. - The silhouette line is not connex: In this case, replace the line parts by a single closed silhouette line descriptor. Remarks: - Closed lines are accepted as well as outlines. - Affiliating child outlines to parent silhouette outlines allow subtracting their area / defining holes.
|
||
| Why and how to import a Bitmap in Current Project ? | ||
|
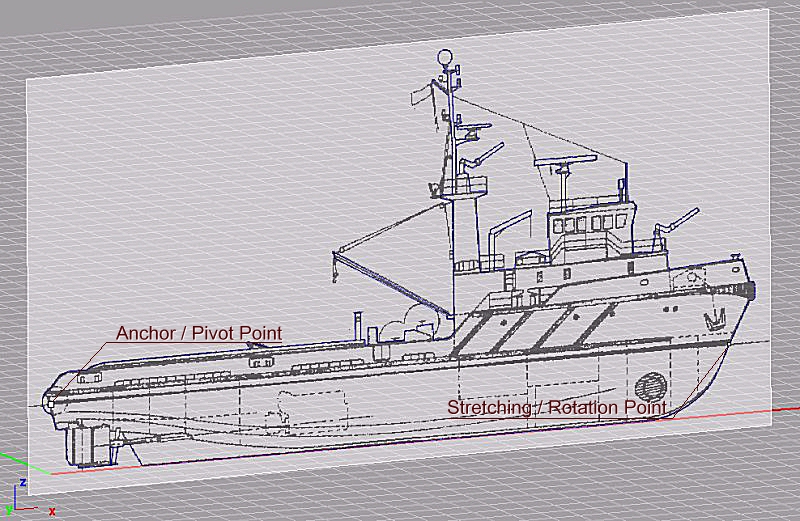
A direct visual control or acquisition based on scanned documents is often useful, especially when it couldn't be done upstream. Thus, for example, a direct control or recopy of ship's silhouette or other important lines, can be great when these elements coudn't be imported or checked before. For this purpose, MAAT Hydro's 'Bitmap' objects allow importing bitmap files in the project by associating them to a 3D rectangle in order to make them usable as 3D overlays. MAAT Hydro's bitmap objects are created by selecting a parent folder in the 3D browser and 'New Bitmap' in the right click menu. A 'bmp' file must, then, be selected (only 'bmp' files are accepted for the moment), before anchoring, stretching and orienting bitmap's rectangle by 2 left clicks in a 3D viewport. An accurate dimensionning of the created bitmap can be done later, at any time, by identifying 2 remarkable points/bitmap pixels whose coordinates are know can be specified. The following example will provide the details of this operation: - Run MAAT Hydro, select 'My Project' as bitmap's parent in the 3D browser, and select 'New Bitmap' in the right click menu. - Select the '/Bitmaps/Demo Tug Lng.bmp' file in the file selection dialog box ('BMP' format is the only one available for the moment). - Enter bitmap's lower left corner by clicking in the 'Right' viewport (the bitmap file contains a tug boat silhouette). - Enter bitmap's lower right corner by clicking a 2nd time in the 'Right' viewport.. - The 'Bitmap' object is, then, created in the parent folder and appears in the 3D viewports. - Selecting this object in the 3D browser (or clicking on its frame in a 3D viewport) allows selecting it and displaying its 2 scaling points, used for dimensionning the bitmap accurately: An anchor / pivot point (large) and a stretching / rotation point (small). - When these scaling points are displayed: * A short left click on one of them will allow setting its target position visually and validating it by a 2nd left click, or by typing its coordinates directly in the x,y,z[Return] format when these coordinates are known accurately (i.e. when this point has remarkable coordinates, like 0,0,0). * Selecting and moving a scaling point while keeping the left button pressed will allow modifying its associated pixel in the bitmap before entering its target position like previously. As bitmap's default scaling points are located on its lower corners, moving them onto bitmap's appropriate pixel is usually necessary before entering their target coordinates (for example, moving lower left corner's scaling point onto bitmap's AP pixel while keeping left button down before releasing it and typing 0,0,0[Return] to assign the x,y,z origin to this bitmap pixel). * Hit [-][Return] to mirror the selected bitmap (for example for swapping starboard and portside). * Hit [x]xxxxx[Return] to assign the xxxxx coordinate to bitmap's x coordinate and, similarly, [y]yyyyy[Return] to assign yyyyy to its y coordinate or [z]zzzzz[Return] to assign zzzzz to its z coordinate. - The [Data] page also allows setting other bitmap parameters, like the 'Property' field, which controls its transparency (0% = clear, 100% = opaque, 25% by default). The '/Demo Files/Silhouette Bitmap Example.m2a' file contains the typical results of this example. MAAT Hydro's bitmap objects are direcly encoded in the 'm2a' file, so that the original 'bmp' files are no longer needed after creation. Nevertheless, although bitmap's contents are automatically compressed by MAAT Hydro for 'm2a' storage, attention will be paid to using the smallest 'bmp' files possible when a compact 'm2a' file is expected.
|
||
| How to Manage Masses with MAAT Hydro ? | ||
|
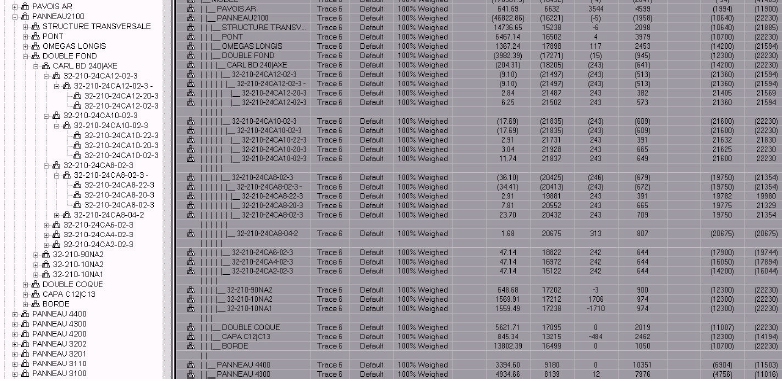
Masses are the necessary counterpart of ship's buoyancy, being therefore necessary for calculating its hydrostatic equilibrium. In order to define ship's masses in a flexible, accurate and convenient way for ship designers, MAAT Hydro therefore also provides a totally recursive mass definition, allowing to combine and weigh any solid and liquid load in real time: - 'Totally recusive' means that you can encapsulate ship's weight estimate items, sub-items, etc… as children, sub-children, etc… of a parent 'weight estimate' item. - 'Weighing solid and liquid loads in real time' means that any project's mass or tank can be weighed instantly by a «Quantity» setting on the [Data] page, interacting in real time with the overall weight estimate and distribution. Moreover, mass's longitudinal extension being also necessary for calculating the weight curve as well as longitudinal strengths, each mass is finally determined by its weight, Gx,Gy, Gz and its xmin / xmax limits, which can be specified in the corresponding [Data] page columns.. Full details on MAAT Hydro's mass management and weight curve modelling are given in MAAT Hydro’s 'Quick Hydrostatic Modelling Guide’.(see item 9: Mass Modelling). Masses describing ship's load can then be directly created and modified on project's [Data] page but, as mass estimates are often available in other software (MAAT 2000, EXCEL, …), they can be directly imported in the project : - MAAT 2000 Masses and Loadings are directly converted into MAAT Hydro Masses. - CSV files created by spreadsheets like EXCEL can be directly read in order to recover any previously defined estimate (line headers define mass's hierarchy according to the specified indentation step). This typical CSV file, installed with MAAT Hydro's file system in the '/User Data/CSV Files' folder, will illustrate this feature.
|
||
| How to manage tanks globally ? | ||
|
MAAT Hydro's [Data] tab allows setting the tank data individually, which allows defining exactly their status, but may become tedious when they are numerous. For this purpose, MAAT Hydro also allows setting globally the features of the tanks selected in the 3D browser, in order to allow a complementary quick and synthetic setting When the concerned tanks are selected in the 3D browser, the popup menu which appears with a right mouse click provides the following global functions: - 'Damage Selected Items' allows damaging (100%) all the selected tanks in a single operation. - 'Restore Selected Items' allows restoring all the selected tanks to the intact state in a single operation. - 'Force Tank Fillings' allows applying the 0-100% filling ratio entered and validated by [Return] to the selected tanks in a single operation. - 'Force Tank Permeabilities' allows applying the 0-100% permeability entered and validated by [Return] to the selected tanks in a single operation. - 'Maximize Tank FSMs' allows maximizing the free surface effect of the selected tanks in a single operation. - 'Force Tank Layers to Current' allows applying status bar's current layer to the selected tanks in a single operation. - 'Convert Tanks to Compartments' allows converting all the selected tanks into compartments in a single operation. - 'Convert Compartments to Tanks' allows converting all the selected compartments into tanks in a single operation.
|
||
| How to define tank pipes and get the corresponding tank reports (calibrations / soundings) ? |  |
|
|
Whenever necessary, MAAT Hydro allows modelling tank's pipes in order to calculate tank's associated soundings / ullages for design purpose ('/Tools/Tank Calibration') as well as for onboard purpose ('/Tools/Sounding Tables'). Tank pipes can be easily defined as follows: - Import or create the line(s) representing tank's pipe(s). - On the [Data] page, turn their layer to the 'Tank Pipe Layer' selected on [Ship] tab's [Hydro] page. - Affiliate these tank pipe descriptors to their tank parent. MAAT Hydro automatically detects such tank pipes and calculates their associated data.
|
||
| How to model Tank Baffles ? |  |
|
|
Whenever necessary, MAAT Hydro allows modeling tank’s baffles in order to allow taking the corresponding FSM gain into account. Creating or modifying tank's baffles can be done by selecting it in the 3D browser, right clicking and selecting ‘Set Solid Baffles’ in the popup menu. All the details on this operation are provided in dialog box’s online help. |
||
| How to add a constant or max Free Surface Moment to a tank ? | ||
|
Certain regulations and / or classification societies require addinga fixed or maximum Free Surface Moments to certain tanks. Since Rev. 9.0, MAAT Hydro allows selecting or fixing directly tank's F.S.M. type and / or constant value by clicking in its 'F.S.M. field on the [Data] page. The selector which pops up allows choosing between a constant max FSM (select 'Max FSM') and the real variable FSM (select 'Free FSM'), typing any other valid constant value on the keyboard being also accepted. It is also recalled that, since Rev. 8.0, MAAT Hydro already allowed adding a maximum F.S. effect to full tanks: - By selecting the 'Full + Max FSM' option in tank's 'Quantity' field on the [Data] page. - By selecting the concerned tanks in the 3D browser and selecting the 'Maximize Filling + FSM' option in right click's popup menu. Before MAAT Hydro's Rev. 8.0, the previous revisions only allowed modeling realistic situations, i.e. approximating this requirement by filling the concerned tanks to their maximum FSM level and, then, selecting the dedicated '/Mass/Tanks Filling' function in order to automatically add tank's missing load. Although it is still possible, this approximation procedure is now obsolete and no longer needed. |
||
| How to maintain the liquid load of damaged tanks ? | ||
|
Certain regulations require processing damaged tank's liquid load in the damage stability calculation. As MAAT Hydro automatically cancels damaged tank's liquid load, this modeling procedure can be followed for reaching this requirement: - Create a small solid (box, sphere,...whose volume is neglectable), preferentially in a non-immersed area. - Duplicate the tanks to be damaged in this auxiliary solid, which will have to remain in the intact state in order to avoid acounting the buoyancy of its children. - Create the necessary loading conditions after defining the filling of these duplicated tanks and dumping the original ones, so that their liquid load will only be accounted once. - Create the necessary damage conditions after damaging the original (dumped) tanks (so that their buoyancy will be subtracted) and leaving their 'clones' in the intact state (so that and their liquid effect will be accounted).
|
||
| How to simulate compartment's downflooding by sumersion of his opening(s) ? |  |
|
|
Whenever necessary, MAAT Hydro's compartment flooding may depend on line submersion, provided that:- These lines are children of the compartment's whose buoyancy must depend on?. - Their layer is? the 'Downfloodable Opening Layer 1' defined on [Ship] tab's 'Hydro' page. You can easily check this important feature by heeling the virtual ship on the [Hydro] viewport and controlling the curve of area's changes when the affiliated openings become submersed.: - Compartiment remains in the intact state as long as the affiliated opening is not submersed.. - Compartment remains in the flooded state (residuary buoyancy depending on its permeability) as long as the draft of an affiliated opening exceeds the 'Downflooding Range' value (defined on [Ship] tab's 'Hydro' page). - Compartment's buoyancy is linearly interpolated between these extremes according to the maximum draft of its openings. Let us notice that when the 'Downflooding Range' is set to 0, the corresponding buoyancy loss will suddenly toggle from one extreme to the other without any interpolation, which may disturb ship balance's iterative algorithm in certain extreme cases. A similar mechanism allows modeling tank's overflow by affiliating it an 'overflow sheer line' (i.e. a line set in the 'Overflow Layer' defined on [Ship] tab's 'Hydro' page). The dredge stability calculations are simultaneously based on these overflowing / downflooding mechanisms to simulate hopper's behavior (see the 'Dredge Stability Calculation' item). At last, as it may sometimes be interesting to control compartment's buoyancy by the simultaneous immersion of 2 or 3 distinct openings, MAAT Hydro also allows affiliating 2nd and 3rd level openings . (i.e. set in the 'Downfloodable Opening Layer 2' / ''Downfloodable Opening Layer 3' layers) to a compartment, in addition to the 1st level openings introduced above. Compartment's behavior will then be the following: - When 1st and 2nd level openings are affiliated, compartment will only start to be flooded when 1st and 2nd level openings will be submersed simultaneously. - When 1st, 2nd and 3rd level openings are affiliated, compartment will only start to be flooded when 1st and 2nd and 3rd level openings will be submersed simultaneously. This mechanism therefore allows modeling complex downflooding dependances. Finally, it may now be obvious that affiliating an opening to a single compartment model is a dangerous practice, as ship's buoyancy may totally vanish when the opening becomes submerged.?
|
||
| How to simulate opened tank's spilling and inflow ? | ||
|
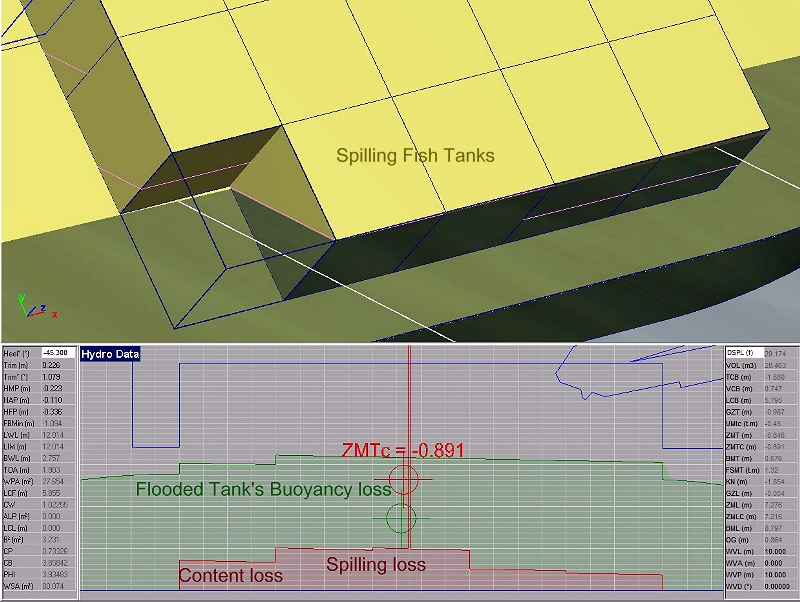
Like for controlling compartment's buoyancy by the submersion of opening descriptors (see above), tank's spilling and inflow may also be controlled by containing an opening descriptor. These opening descriptors, which are the lines by where tank's content may spill or be flooded, must be tank's children and set in the 'Flooding Layer' selected on [Ship] tab's [Hydro] page. When a tank contains such an opening descriptor, the free surface of its content will be automatically adjusted so that it will never exceed this opening (spilling). Tank's content may therefore decrease automatically according to its filling, opening geometry and heel angle (you can easily control the incidence of heel on ship's displacement and weight curve by opening the [Hydro] viewport and incrementing heel angle). Moreover, when such an opened tank is not a compartment child, the submersion of its opening under ship's floatation will automatically flood it (simultaneous content and buoyancy loss). Like previously, you can easily control the incidence of heel on ship's displacement, weight curve and curve of areas by opening the [Hydro] viewport and incrementing heel angle). Such tank openings must not be confused with sounding pipes.
An example file illustrating this possibility can be downloaded here. Moreover, it is also important to stress that tank's inflow and spilling makes ship's displacement variable according to its heel, so that the calculated GZs are no longer proportional to ship's righting moment and must therefore be corrected. The standard STC scripts used for processing such models must therefore be implemented accordingly: Data delta("Dsp", DSPL, h0) // Creates a 'delta' data representing ship's reference moulded displacement (at 0°) Heelpoint heel("heel buffer", CONSTANT, 0.0)// Creates the heel abscissa buffer needed for creating the gzcor curve Curve deltah("Delta(heel)", DSPL)// Creates a (variable) displacement curve named "deltah" Curve gzcor("GZ.Delta/Delta0", heel, {gz(heel)*deltah(heel)/delta})// Creates a corrected GZcurve named "gzcor" Curve agzcor("GZ.D/D0 Area", gzcor, 0.0, 0.0)// Creates corrected GZ's area curve named "agzcor" Heelpoint hx("GZc Max", MAX, gzcor)// Finds Max corrected GZ heel and creates a heel point named "hx" for further use Data gzx("GZc Max", gzcor, hx) // Finds Max corrected GZ and creates a lever named "gzx" for further use When the standard GZs are corrected according to displacement's changes, the corrected GZs can also be listed in stability's data list ListTab(gz, "GZ", 88, 90) The following STC commands list the corrected GZs and GZ areas: ListTab(gzcor, "GZc", 97, 99) ListTab(agzcor, "GZc Area", 108, 107) |
||
| Which objects must contain a MAAT Hydro model to be computable ? |  |
|
| The calculated model is the model currently displayed, corresponding to the active directory. When the project contains a single directory, it is automatically opened, becoming active directly after opening the file.
The first steps are therefore to create a directory in MAAT Hydro’s 3D browser, if not done yet, to include the necessary components in it and to double click this directory to make it active. As soon as a solid is included in the active directory, its hydrostatic features can be obtained in real time by clicking on the [Hydro] cell located at bottom of Window. Nevertheless, the active directory must also contain one or more ponderous objects (masses, filled tanks…) in order to counterbalance float’s buoyancy and be able to calculate the corresponding balance floatation. Moreover, a certain number of lines may also be necessary to allow certain calculations:
The IGES file opening box automatically prepares a directory containing a mass corresponding to the loading condition, with the imported lines, faces and solids, the project parameters being automatically preset according to the input data. The imported solid faces therefore just have to be gathered in a watertight solid and lines to be located in the appropriate layer.
|
||
| How to check solid face’s water pressure direction ? |  |
|
| Each solid face has 2 opposite sides on which water can exert opposite pressures. Checking that only “wet” sides appear out of the solid is therefore very important, as integrating solid’s buoyancy with reversed faces would seriously vitiate its hydrostatic features.
Although MAAT Hydro automatically orients wet and dry sides when joining solid faces them, it is a good choice to check that no singularity has disturbed the process. The [Alt][/] shortcut therefore allows toggling viewport’s rendering mode from normal mode to face orientation mode, in which “wet” sides are shaded in green and “dry” sides in red. Nevertheless, don’t expect any display change in non rendered viewports. As reversed faces will appear in red in this display mode, their location can be done easily by turning around the solid, the reversed faces having to be reoriented with "Set Solid Faces" function. |
||
| Why are certain IGES imports so long ? |  |
|
|
MAAT Hydro’s IGES imports include a high level optimization process (automatic order reduction, unnecessary patches/isos removal, singularity process …) in order to make the imported model as compact as possible and to optimize tha calculation speed accordingly. Generally speaking, it is recommended to avoid importing very heavy IGES files (let’s say more than ten megabytes) by optimizing the model in your 3D modeler first (remove all the unnecessary details), otherwise MAAT Hydro’s hydrostatic engine may significantly slow down. |
||
| How to reverse the inversed faces ? |  |
|
|
On certain models containing numerous singular faces, the automatic face orientation algorithm invoked by the “Solid/Join” function may fail, making a manual correction necessary. In such cases, just select the erroneous solid in MAAT Hydro’s 3D browser, right click and select “Set Solid Faces” in the contextual menu. Model display automatically turns to the “red/green” mode, allowing location of the wrong (red) faces immediately, a dialog box appears, allowing reversal of any listed face by a double click on its name (simple clicks only highlights the corresponding face ). You can close the dialog box when all the faces are green and repeat this process with different points of view if necessary. |
||
| What happens when solid’s faces are not stricly contiguous ? |  |
|
|
As MAAT Hydro doesn’t refuse creating a non-watertight solid, it is important to appreciate the incidence of such “leaks” on float’s hydrostatic behavior. Fortunately, the hydrostatic pressure being integrated on all the immersed faces, “leaks” will not cause a greater damage than a certain buoyancy shortage. This buoyancy shortage can be easily appreciated by comparing the volume obtained by extruding the “leaks” perpendicularly to the floatation with the volume obtained by extruding the faces. This ratio is usually negligible. Certain solid faces can therefore be missing without any incidence on float’s hydrostatic features… as long as the immersed hull is watertight. If such “leaks” usually have a negligible incidence on the float’s behavior, it may unfortunately cause problems when dividing it into compartments with the “Solid/Split” functions. Actually, as soon as the splitting plane or surface crosses such “leaks”, the resulting intersection is not connex, making the operation impossible. |
||
| How to recover a MAAT 2000 sectionned float in MAAT Hydro? |  |
|
|
MAAT Hydro automatically extrudes MAAT 2000’s sectioned floats in order to convert them into equivalent MAAT Hydro solids. Nevertheless, as this process often produces heavy and hardly splittable MAAT Hydro solids, just use it when no other solution is available. |
||
|
|
||
|
Why and how to distinguish between buoyancy loss and added mass damage calculations ? |
||
|
A General:
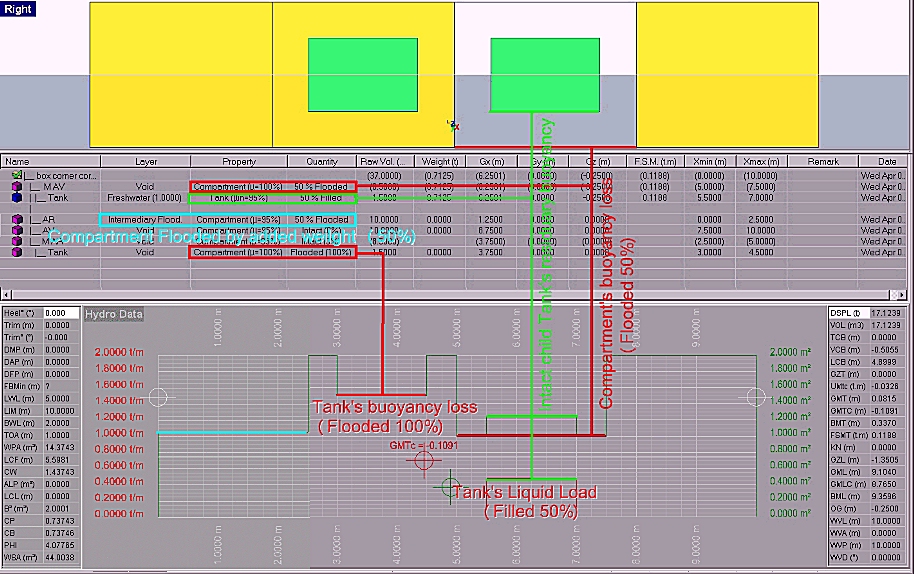
The buoyancy loss process of a damaged compartment consists in reducing its buoyancy according to its current permeability and flooding ratio. It therfore assumes that the flooding water can flow freely by the hole, which is supposed to be large enough. As it simply consists in weighting compartment's buoyancy, this proceeding is the easiest to use and allows calculating ship's final equilibrium. The added weight process initially consisted in replacing compartment's damage by an additional load corresponding to the amount of water flooding the compartment at equilibrium. As today's hydrostatic solvers can easily calculate the real liquid effect, the added weight approach now consists in replacing the damaged compartment by an equivalent tank containing the amount of inflow at equilibrium. As this inflow is supposed to be constant, compartment's hole is implicitly assumed to be small enough. This proceeding is heavier to use and is generally used for calculating ship's stability at intermediate flooding stages. Because of its ease of use, the lost buoyancy process is therefore the most commonly used but, depending on the size of its hole, any real damage necessarily behaves between the lost buoyancy and the added weight model. Moreover, as certain floodable areas can be connected to the damaged elements, a sharp stability analysis may imply analizing the corresponding critical intermediate stages. B MAAT Hydro approach: As the buoyancy loss process is the most common, only the compartments having to be processed by added weight (i.e replaced by an equivalent tank containing the calculated inflow) during the stability calculations have to be identified by setting their layer to the 'Intermediate Flooding Layer' selected on [Ship] tab's [Hydro] page.
Moreover, don't forget that an 'Intermediate Flooding Layer' compartment with a 0% flooding ratio will be considered as intact. At last, let us recall that the number of intermediate flooding stages calculated in the probabilistic stability can be set as the 'Interm. Flood. Stage Number' on [Ship] tab's [Hydro] page.
|
||
|
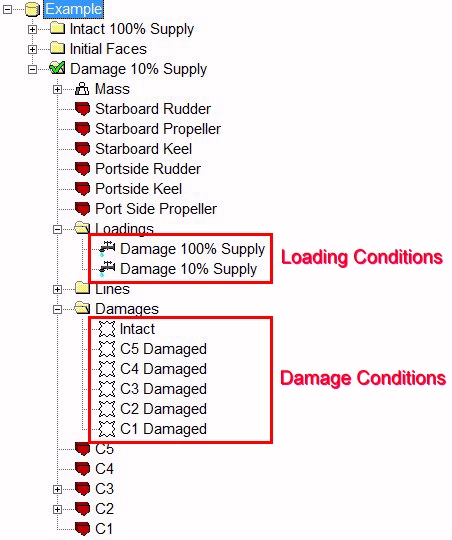
Ship's hydrostatic analysis generally operates on a certain number of loading and damage conditions, so that they must be registered in order to become immediately restorable. MAAT Hydro therefore manages two distinct but tightly related objects:
A) 'Loading Condition': MAAT Hydro allows creating as many 'Loading Conditions' as necessary, each of them allowing to register:
Creating a Loading Condition starts by setting the parameters listed above on the [Data] page (fix masses, tank layers and fillings, compartment permeabilities, silhouette). As soon as these settings are finished, just select Loading Condition's parent folder in the 3D browser and select 'Make Loading Condition' in right click's popup menu. A 'Loading Condition' objet then appears in the 3D browser, containing an immediately restorable copy of the current settings. You therefore just have to repeat this operation as many times as necessary for registering all the Loading Conditions once and for all, in order to make them immediately restorable by a double click in the 3D browser. Nevertheless, you will notice that restoring a Loading Condition also automatically resets ship's damage to the intact state, Loading Condition's name being simultaneously recalled in the lower status bar, with the current Damage Condition. You must therefore pay attention to always restore the Loading Condition before restoring any Damage Condition. Moreover, as Loading Conditions register the pointed tanks and compartments by their path name, it is also important not to rename or move them after having created Loading Conditions: Such broken links would prevent the Loading Condition to control the pointed object automatically (loss of the layer, filling and permeabilty control of the renamed or moved elements). In order to prevent such risks, the '/Tools/Check Model' function automatically detects such broken links, so that you can directly correct these corrupted Loading Conditions with the following Loading Condition management functions, available in 3D browser's popup menu:
B) 'Damage Condition': Similarly, MAAT Hydro also allows creating as many 'Damage Conditions' as necessary, each of them allowing to register:
Creating a Damage Condition starts by setting the parameters listed above on the [Data] page (compartment's flooding ratios and layers, removal of useless openings, ...). As soon as these settings are finished, just select Damage Condition's parent folder in the 3D browser and select 'Make Damage Condition' in right click's popup menu. A 'Damage Condition' object then appears in the 3D browser, containing an immediately restorable copy of the current settings. You therefore just have to repeat this operation as many times as necessary for registering all the Damage Conditions once and for all, in order to make them immediately restorable by a double click in the 3D browser. Nevertheless, you will notice that, unlike for restoring a Loading Condition, restoring a Damage Condition must obviously not restore ship's damage status, so that, as explained above, you should always restore the Loading Condition before restoring any Damage Condition.. Like previously, Damage Condition's name is recalled in the lower status bar, with the current Loading Condition. Moreover, as tanks and compartments are identified by their path name by the Damage Condition, it is also important not to rename or move them after having created Damage Conditions: Such broken links would prevent Damage Condition to control the layer and damage ratio of the renamed or moved elements. Here again, in order to prevent such errors, don't hesitate to use the '/Tools/Check Model' function, which will automatically detect such broken links. Once all the Loading and Damage Conditions of the project are defined, certain automated calculations become available:
|
||

