Go to Help Summary Go to FAQ Summary
[Ship] tab/'Capacity Layout' page/Overlay / [Ship] tab/'Compartment Layout' page/Overlay
____________________________________________________________________________________________________________________
Purpose:
Allows 'dressing' default raw MAAT Hydro views with user defined lines imported from a DXF file (version 13 only).
Inputs:
The following dialog box pops up when an 'Overlay' field is clicked:
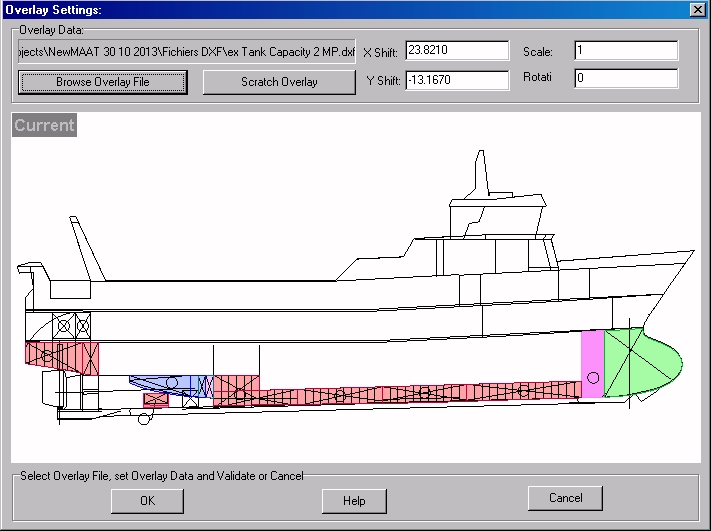
The upper left field displays the current DXF file name when specified.
The [Browse Overlay File] button allows selecting a new DXF file (please, notice that DXF version 13 is the only supported version).
The [Scratch Overlay] button allows removing current imported overlay and returning to the initial default view.
The 'X Shift' / Y Shift' input fields allow shifting the imported lines, if necessary, if the origin of the imported lines is different of MAAT Hydro's origin.
The 'Scale' input field allows scaling the imported lines, if necessary, in order to get them in the MAAT Hydro scale (full size). As DXF files usually use millimeters, the default scale is 1, but it must be set to 1000 when meters are used instead of millimeters.
The 'Rotation' input field allow rotating the imported lines, if necessary. In particular a +/- 90° rotation angle allows flipping X and Y coordinates.
Don't forget to press the [Enter] key after setting these transformation parameters, if you want to control the result in the preview area.
Don't forget also that you can remove any of the displayed lines by clicking / enclosing them in a rectangular area and pressing the [Delete] key (re-loading the file allows returning to the initial lines).
The [OK] button allows validating the current overlay setting.
The [Help] button allows displaying the online help (Internet access necessary).
The [Cancel] button allows cancelling the cureent settings.
Outputs:
After clicking on the [OK] button, the selected overlay lines are ready for use in the associated reports. Please notice that MAAT Hydro's documents only refer to these lines, so that the concerned documents will be automatically updated whenever you update the overlay data.
Limitations:
This function is useless as long as no tank / compartment is defined.
DXF's version 13 is the only format currently supported. Attention must be paid to the units used in the file (mm or m) innorder to set the conversion scale correctly (1 or 1000).
Typical use:
'Dressing' default raw MAAT Hydro views in order to make them more detailed / realistic.
Example:
Open a project containing tanks and select the current model in the 3D browser.
Click on the lower left [Ship] tab.
Select 'Capacity Layout' in the left browser.
Right click on the right list and select 'New Capacity View' in the popup menu (see FAQ for details on these settings).
Set view's name in the 'Name' field.
Select the corresponding plane in the 'Plane' field
Set plane's reference position in the 'Position' field.
If necessary, set non zero values in the 'Min Offset' / 'Max Offset' fields.
Click on the 'Overlay' field to display the overlay setting dialog box and input the corresponding data as explained above.
You can repeat this procedure as many times as necessary for defing all the views you want to include in MAAT Hydro's capacity plan.
You can also right click on any view in the list and delete it or move it up or down thanks to the popup menu.
When all the views are defined, select '/Tools/ Float Analysis' in the menu bar and notice that a capacity plan is now included in the report, corresponding to your settings.
Select '/Tools/Tank calibration' in the menu bar and notice that a capacity plan is now also included in the report, corresponding to your settings.
Select '/Tools/Transverse Stability' in the menu bar, tick the 'List Ship Status' option and notice that a capacity plan is now also included in the 'Status' pages, corresponding to your settings.